Friday, November 29, 2013

DISODIUM GUANYLATE? What does that even mean??

As I'm sure you might have guessed, we take food pretty seriously around here. We try to grow as much as we possibly can (last week we harvested the peanuts that the kids planted!), and make what we can't. We aren't gluten-free and luckily we don't have any allergies to work around, but all of the bread, hamburger or hot dog buns, pie crusts, cookies, pizza dough, and lately even tortillas and pasta is home made. This takes a LOT of effort, but I can't think of anything better than showing my family my love for them by feeding them the very best food that I can.

Of course, I have encouragement in this. When we are watching TV together (sans kids, of course) my husband will say helpful things to the moms in commercials for fast food or frozen pizza such as, "You're a bad parent!" And, I mean, seriously, who buys Pop Tarts and Pizza Rolls these days? I'd say you might as well give a kid a can of Crisco and a spoon, but Crisco doesn't have transfats, and I'm pretty sure Hot Pockets still do.

Sometimes my husband or kids want to take it a step further than I want to, though. Veggie burgers, for example. Yes, it's still highly processed frozen food, but shouldn't moms feel good about feeding their kids veggie burgers instead of beef? And of course this week when we were doing the meal planning, the kids requested veggie burgers - but home made, of course. "Ugggghhhhh," I'm thinking in my head. Just "uggggghhhh." I've done that before and it's so much WORK. But of course I'm a sucker, and the advantage of doing all the work is that you can make a lot at once and freeze them so veggie burgers become the easy pop-in-the-oven meal they were meant to be.

So here's how I made veggie burgers that kids love out of things that kids think they hate. Wear comfortable shoes.

You're gonna need beans.
LOTS of beans. This is a 2 lb. bag of pinto beans that I rinsed, soaked overnight, and then cooked till very soft. I'll spare you the details as I'm sure every vegetarian knows how to cook beans. I seasoned them with salt, pepper, garlic, and onion powder, and of course a bit of oil to keep the foam down.

BUT WAIT - THERE'S MORE!

MORE BEANS?!

Yep, more beans. This is a one pound bag of chickpeas that got the same treatment, plus a splash of lemon juice just at the end.

Now, honestly you could probably use canned beans for this. I'm not sure because I don't buy canned beans, nor anything else that comes in a can other than black olives. Dried beans are much cheaper, tastier, and you can control the sodium content. Plus I had enough from both of these to freeze leftover batches of beans which will make pulling together curry or falafel or tacos a snap. And in fact, if you have frozen beans from other projects, just thaw those out for this. It doesn't matter what kind of beans, anything will work!

But wait! There's still more (work)! So much more (soul crushing, standing on your feet work)!

To get a meaty flavor, we're going to need some natural glutamates. Mushrooms are an obvious choice, but my kids all think that they hate them, so I sent them outside to have an epic Nerf battle while I did this part so no one would question what was in the veggie burgers.


This is about a pound of mushrooms and one large onion, both roughly chopped, seasoned with salt, pepper, Worcestershire sauce (you could use the vegan kind if you are more strict about these things than I am) and a bit of reduced-sodium soy sauce. Cook that down and then crank up the heat a bit to get some nice caramelization going.

MEANWHILE...


Soak 1 cup of medium bulgar in 1 cup water. I've tried a couple of things to supplement the texture of veggie burgers, but I like bulgar the best. The commercial products rely on TVP, which I'm sure is fine but I rarely keep it on hand. Brown rice also works well, but if you use that you're also going to have to cook some brown rice, and who needs that?

Move the mushrooms and onions to a food processor and add the softened bulgar to the same pan. That way it can soak up all the flavor left behind.

Now comes the easy part, assuming you have a good food processor. Pulse the onions and mushrooms till well chopped, then add about 3 cups of the cooked pinto beans and a cup and a half of chickpeas. Really just cram whatever you can into your particular food processor. Blend that a bit then toss in the bulgar.

Once it's mixed, scoop it out into a bowl.

Now, here I have a confession to make, but before that a short memory. At one point my mom told me that my grandmother apologized to her for something not being home made since she had used the food processor to make it. And we can all agree that that's pretty crazy, right? Using a tool doesn't negate all the rest of the effort that goes into making something at home. So keep that in mind when you look at the next picture...


YEAH YEAH YEAH SO I USED SOME PANKO. GAH.

Once I watched an episode of Good Eats where Alton Brown talked about spraying dough into an electrified screen to make it, but here he explains it a little differently:


In this recipe they really do add a lot of good texture, in addition to absorbing excess moisture to make your patties more patty-shaped. I stirred in probably two cups of panko along with two fresh eggs. If you don't have fresh eggs you might want to taste for seasoning at this point, adding salt pepper and garlic or onion powder as necessary.

Spatula from Dollar Tree. Pyrex bowl inherited from above referenced grandmother!

 Stir it all together and then it's time to make the gloopy mess ready for those nice, homemade whole wheat buns I'm sure you baked already. You could shape it by hand... OR


REMEMBER THESE? I'm pretty sure as soon as you had a baby in the 80s, the hospital handed you one of these. Every mom had one. And probably twenty or so of the little patty storage Tupperware containers with beige lids that could be frozen! And of course when you use them for meat, the beef shrinks up upon cooking so that you have tiny little hamburgers dwarfed by even standard issue grocery store hamburger bungs. Luckily for us vegetarians, beans don't shrink.

Spray every surface of this thing and a cookie sheet with non-stick cooking spray. Add about a 1/3 cup portion of the mix to the mold and press it with the plunger. There is no neat way I've found to de-veggie burger the thing other than just slamming the open side down onto the cookie sheet. Re-spray and/or wipe out the mold pieces as necessary.

Where's the beef? STILL ATTACHED TO THE COW!
Lookin' pretty meaty, right? Stick those right into the freezer until frozen through and then pop them into a bag or freezer container so that you don't have to go through all this for awhile. You can bake them fresh or frozen at 400 degrees for about 20 minutes. You might want to flip them halfway through the cooking time for nice color on both sides.

And 289375892375892370459872345 steps later, VOILA! Veggie burgers!


Wherein I cover up the fact that I am staggeringly bad at food photography with a series of online photo filters.

Homemade Veggie Burgers 

Ingredients

2 lbs Pinto beans, cooked according to package directions
1 lb Chickpeas, cooked according to package directions
1 large onion, roughly chopped
1 lb. mushrooms, roughly chopped
1 tbsp. Worcestershire sauce
2 tbsp. soy sauce
2 tbsp. olive oil
1 cup medium bulgar
2 cups Panko breadcrumbs
2 eggs
1 tsp. garlic powder
1 tbsp. onion powder
salt and pepper, to taste

Directions

1. Cook beans, seasoning with olive oil, salt, pepper, garlic and onion powders to taste. 
2. Add 1 cup boiling water to bulgar, cover and let sit.
3. Over medium-high heat, saute mushrooms and onion in olive oil until nicely browned. Add Worcestershire and soy sauces, plus salt and pepper.
4. Add mushroom mixture to bowl of food processor and pulse to chop. Add several cups of beans, as many as will fit. You may have to work in batches, depending on the size of your food processor.
5. In pan used for mushrooms, add bulgar and toast lightly. Add to food processor.
6. Remove to a bowl and stir in eggs and Panko, tasting for seasoning.
7. Shape into patties and freeze till firm.

Bake 20 minutes in 400 degree oven, turning once if desired. Makes 24 veggie burgers.

And while I still think the frozen kind are pretty good, it's nice to be able to pronounce everything that's in mine. Just what is disodium inosinate anyway?

From the Morningstar Farms Grillers Originals website:

TEXTURED VEGETABLE PROTEIN (WHEAT GLUTEN, SOY PROTEIN CONCENTRATE, WATER FOR HYDRATION), EGG WHITES, CORN OIL, CALCIUM CASEINATE, CONTAINS TWO PERCENT OR LESS OF MODIFIED TAPIOCA STARCH, ONION POWDER, CANOLA OIL, TRIGLYCERIDES FROM COCONUT OIL, HYDROLYZED VEGETABLE PROTEIN (CORN GLUTEN, WHEAT GLUTEN, SOY PROTEIN), DEXTROSE, SALT, SOY PROTEIN ISOLATE, AUTOLYZED YEAST EXTRACT, SUGAR, NATURAL AND ARTIFICIAL FLAVORS FROM NON-MEAT SOURCES, CARAMEL COLOR, CULTURED WHEY, MALTODEXTRIN, GARLIC POWDER, SPICE, CELLULOSE GUM, DISODIUM GUANYLATE, DISODIUM INOSINATE, SOY SAUCE (WATER, SOYBEANS, SALT, WHEAT), VITAMINS AND MINERALS (NIACINAMIDE, IRON [FERROUS SULFATE], THIAMIN MONONITRATE [VITAMIN B1], PYRIDOXINE HYDROCHLORIDE [VITAMIN B6], RIBOFLAVIN [VITAMIN B2], VITAMIN B12), SESAME SEED OIL, CELERY EXTRACT, SOY LECITHIN.

Monday, October 28, 2013

Happy Halloween

I used to think that I went all out for Halloween. I love costumes, and I have almost as many boxes of Halloween decorations as I do Christmas decorations. This year, however, there was just so much going on that I only managed to decorate inside, throw a wreath on the door and call it done. I still love sharing all the spooky fun with the kids, though, so I made them spiderweb pancakes to have for breakfast this week.


The kids thought they were pretty cool. I just made regular pancake batter, but with white flour rather than whole wheat so the contrast would be more noticeable. Transfer about a cup of the batter to another bowl and color it black with food coloring. My initial thought was to use cocoa powder, but we were out so I just went with the dye. Pour in the white batter first, then swirl on the black and use a toothpick to draw spokes coming out from the center of the pancake.


I had two pans going on the stove to get them done faster.

Spooky Pancakes

2 cups all purpose flour
1/4 cup sugar
2 tsp. baking powder
1/2 tsp. salt
2 cups milk
2 eggs
1/4 cup vegetable oil

Mix the dry ingredients, then add the wet and stir just till mixed. Batter will be lumpy. Transfer 1 cup to another bowl and add black food coloring or cocoa powder to make a dark batter. Pour 1/4 cup light batter into a hot pan and immediately swirl the dark batter on top. Drag a toothpick through both colors to create the web effect. Cook until bubbles form and edges are slightly set and flip. 

And of course, don't forget to leave a note so people can appreciate your hard work. In the morning. While you're still in bed.


I just love having a dry erase kitchen table.

Happy Halloween! 


Saturday, October 12, 2013

Project Runway and Fabric Drama

I want to make a post about the kitchen now that I feel it's finished, but then I looked at other people's kitchen posts and I realized that I'm really bad at photographing kitchens. And really everything else.

So... how about a rambly post about sewing and TV?

You know all you have to do to get me to watch a TV show? Just put the whole thing on Hulu Plus. That's really all it takes. If I can watch the pilot and keep going through the whole series or at least a season, I'll do it. I'm a Libra, I don't like making decisions. Having the next episode waiting for me means I don't have to make a decision!

Lately I started watching season 10 of Project Runway, having no idea which seasons of Project Runway I've actually seen at this point. It's been years since I watched it, but it seems pretty much what I remembered - over-dramatization of the difficulty of sewing a dress. I mean, it's probably hard coming up with something new and innovative that you're being judged on, but COME ON! They get to go to Mood Fabrics with hundreds of dollars and they're still all "WAH WAH WAH! They don't have anything I liiiiiikeeee!"

ARE YOU KIDDING ME?!?!

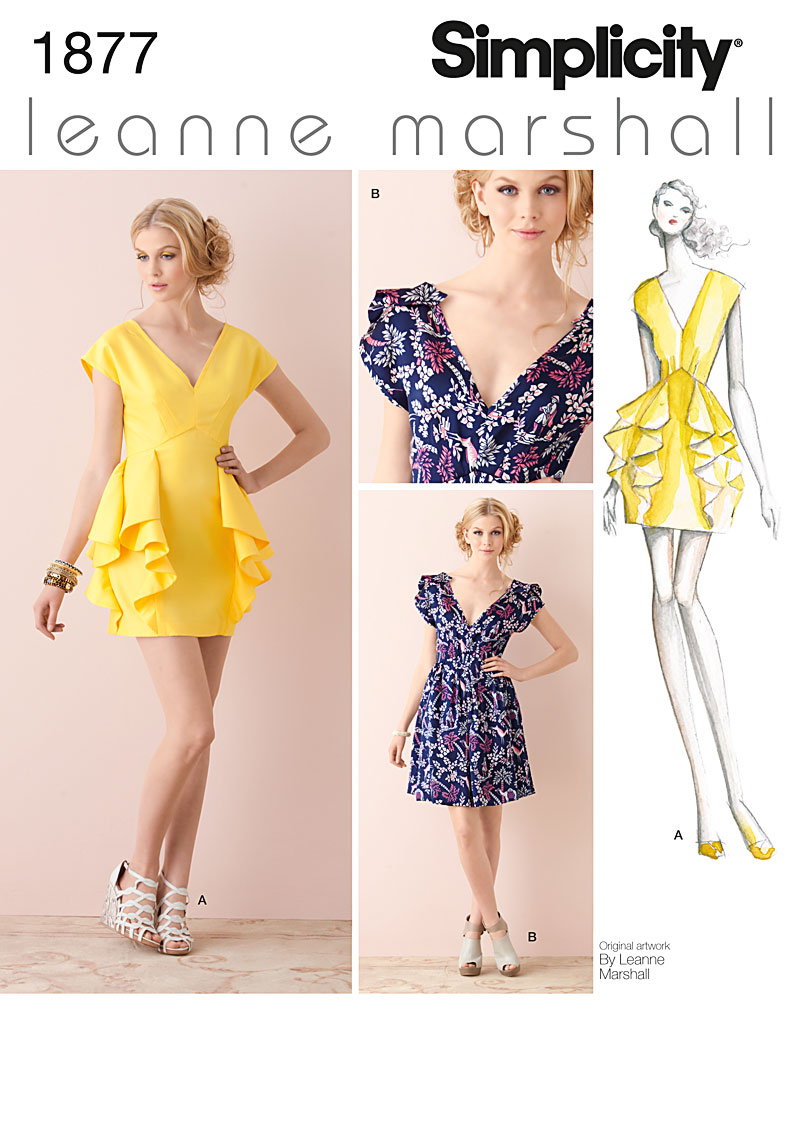
Case in point, I wanted to make a dress using this pattern from Project Runway Season 5 winner Leanne Marshall.


Do you see that cute fabric on view B? It looks like some kind of silk print with little Chinese farmers and stags leaping through a forest of pink ivy and palm trees. WHERE DO YOU GET THAT? Where I live I have three choices for fabric: JoAnn's, Hancock, or Wal-Mart. You know what they don't have and never will? Cute silk prints with little Chinese farmers and stags leaping through a forest of pink ivy and palm trees. However, there are roughly 500 different Disney character prints in quilting cotton for the apparent masses who are into that sort of thing.

But I like THAT DRESS with THAT PRINT, so I wanted to find something as close as I could. Unlike at Mood on Project Runway, I found a fabric that I liked and was prepared to get it cut even though it was $7.97 a yard, which is on the high end of my personal price range. As an aside (I told you this was going to be rambly), sometimes people ask me about sewing clothing or mention that they could save SO MUCH MONEY if they made their own clothes. These people are living in a dream world. Fabric and notions are such a racket, and while occasionally you score a deal, unless you are shopping at high end retail stores to begin with, you probably won't save much by sewing. It probably costs about as much to make a dress as to buy one from, say, Target or H&M, although I suppose with those there is the lingering question of the ethical choices of the textile manufacturers. Are their workers well treated and fairly paid? Are they using chemical processes that create a lot of pollution? And I really can't say. Honestly I don't know much about the sources of commercially available fabrics, although it does seem that many of the fabrics that I've purchased were made in the U.S.A. (sometimes it says it along the selvage edge). Everything gets ethically complicated when you think about it enough. Suffice it to say that I sew for personal satisfaction more than budgetary reasons, but I don't like it to become too expensive a hobby.

Back to the point, there I was, $7.97 a yard fabric picked out at Wal-Mart, but the line at the cutting counter was so long that I didn't have time to buy it. Also I needed a zipper for a specific project that I was doing for someone else and they didn't have the right thing. So I resolved to just go to JoAnn's. Before I got a chance to do that, however, I had occasion to be at a different Wal-Mart where the same exact fabric was on clearance for $4/yd. Score! So I waited at the cutting counter. I asked two different employees to find someone to help me. I was there for HALF AN HOUR and no one came. So I left, stopping to complain to a manager on the way out who THEN offered to help me, but I had places to be and no time or patience left by then.

The next day I drove up to JoAnn's which, despite the larger selection, had nothing even close to what I was looking for. They did have the zipper, though, so I bought that and steeled myself to return to Wal-Mart. This time, there was a line at the cutting counter, but still no employee there. One of the ladies in line said she'd been waiting thirty minutes. I told her what had happened the day before. She was asking any employee who passed by to find help. Finally this one woman who was stocking stuff in a different department came over and said she could do it. We all thanked her profusely and two of us just bought all of the fabric left on our respective bolts because she looked dubious about cutting. Success!! I finally had acquired fabric which, while not as awesome as the fabric in the pattern, was still evidently the best choice in a 30 mile radius.

Navy? Check. Blue, green, and purple flowers? Eh, it'll do.

So I laid it all out and got to cutting, deciding to omit the little shoulder flappy things. Construction was fairly easy, and I loved that it has pockets! There is a pleating detail at the center front of the skirt and the rest is gathered. I liked this because it makes the gathered skirt look more fitted and sophisticated and slightly less frumpy, polygamous housewife as gathered skirts can lean toward.


Normally I prefer invisible zippers, but recently I came across a huge stash of vintage zippers and got over 100 of various colors and lengths for $8. This one was perfect for the job at hand!

And voila!


I wore it to Back to School night at the middle school where I promptly froze to death because they had the air conditioning going full blast. I really like the pattern and will make it again, but it's big enough that I can put it on without the zipper so I'll definitely size down next time. I especially liked the way the neck and arm bindings were, and I could see doing them in a contrast color. I think this dress would work well sized down and made in knit, too. I didn't end up liking the shoulders, so I added rouching along those to narrow them a bit. Next time I'd change the length of the shoulder, or maybe actually make the flappy things. Maybe they would help. 

Still, I like it, which is good after all the trouble I went through to get the fabric! And in the end, I'd guess it cost around $10 total to make, which is something I bet you'll never see on Project Runway!

Saturday, September 7, 2013

Little Green Dress

Years ago on another blog in another time, I used to post a lot of the things that I sew. I used to post a lot in general because I had a lot of alone time. I also used to sew more due to said alone time. Now I use my sparse alone time (although I've been told that football season is starting which translates into sewing time for me!) to actually DO projects instead of just talking about things on the internet all day. I wish I could devote as much time to sewing as I used to, and maybe once we build shelving and organize the office I'll be better set up to do some quick projects. For now, I do what I can when I can.

But I recently made a dress and every time I've worn it I've gotten a compliment from a stranger. Nothing feels better than having someone come up to you and say, "I love your dress! Where did you get it?" and being able to say, "I made it." Of course, this probably annoys the people who complimented you, but why is it suddenly about the feelings of strangers??

I started with this pattern:


It's weird in that there's no View A, B, C, etc. Just a lot of random pieces that you can mix and match to make a dress. This is the fourth time I've used it, and each time I try something different with the skirt. I really love the bodice, but I've never liked the shape of the skirt. It hits right under the bust and is supposed to just have one big pleat in the front and one big pleat in the back. I don't mind it so much in the front, but it is really just too much material in the back. I've tried just gathering it, multiple pleats, darts, and now on this one I did little pintucks that I stitched down in the middle. I'm still not happy with it. I think next time I'll just draft out the excess and cut an A-line skirt. And maybe add in-seam pockets because every dress is better with pockets.


 It's pretty comfy. Since it was a quilting cotton that I picked up at Walmart, I flat-lined it with some navy crepe to give it a better weight. The cap sleeves from the pattern weren't really working for me, so I added loops at the shoulders to gather them up. That turned out to be my favorite part of the dress!

Next up I think I'm going to do a couple of knit projects, and I really want to make a peplum top while they're still in. Looking forward to more sewing as the garden is winding down.

Saturday, August 31, 2013

A Home for Pfaff

So... you guys know I like sewing machines, right? And I already posted about one of the cases and antique machines that I restored here. But that was just ONE of... um... the COMPLETELY REASONABLE number of sewing machines that I have. I can tell it's a reasonable number because my husband still lets me buy them without rolling his eyes even a little. I return the favor when he decides he just HAS to order expensive industrial (like crop-dusting) strength herbicides that are only available on the internet. 

The really nice thing about collecting old sewing machines is just how devalued they tend to be on the presumed basis that practically no one sews anymore, and those who do buy fancy Janome or Huskavarna machines with a million stitches built in and an automatic threader. Which is not to say that modern machines aren't great, but they are mostly made of plastic and I've ruined an expensive newer machine with some of the crazy things I choose to sew. 

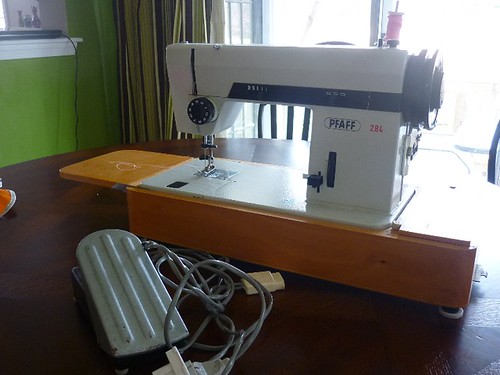
For a long time my sewing machine Holy Grail was to find a Pfaff sewing machine. I'd read blogs and heard people talk about what nice stitching they do, how they are powerhouses and aren't phased by the thickest seams or material. How they last forever and are basically the most awesome thing ever to come out of West Germany. But it's hard to find the old, mostly-metal mid-century models because they now belong to little old ladies who are NOT giving them up. Fortunately for me one day we were at a thrift store and my husband came over and asked, "What's that sewing machine brand you're always looking for? Something with a 'P'?" And then he showed it to me! The beautiful, perfect, Pfaff 284 that became mine for only $25!!

I stole this photo from the internet.
That is not my Pfaff, but it did look just like that after I cleaned it up and oiled it. Unfortunately, my machine didn't come in a pretty wooden case like that. It came in a broken press-board base that snagged every piece of fabric in its immediate vicinity. So for a long time I'd wanted to give it a proper home where I could use it without having to either leave it in the scratchy box or take it out and worry about the bottom of it destroying my desk. Good thing I hoard have other sewing machines!


I picked this table up at another thrift store for $15. It contained a pretty neat in its own right vintage White 468 that was made in Japan.

That's the box that the Pfaff came in.
The neat thing about this is that the motor and belts are internal, so it was late enough they'd figured that out, but not so late that someone thought to, I don't know, PUT A BASE ON THE THING. Why did they used to make sewing machines with so many spikes on the bottom, anyway?

The thing I liked about the table was how it had simple lines that seemed appropriate for the stark, German Pfaff styling. The thing I didn't like was that the finish was orange-y and all scratched up.

Lookin' a little rough there, pal. 

Don't worry! I will help you!!

So I took the thing all apart and promptly let it sit in the basement for five months. What? I'VE BEEN BUSY! A couple of weeks ago I finally had some free time to start working on it. Unlike other sewing machine cases I've refreshed, this one actually had decent wood that wasn't chipping or ruined with peeling veneer. Step one was to strip off the old finish which I did with chemical stripper. Then I sanded it with 150 grit sandpaper, followed by 220, and then 0000 steel wool. Once it was nice and smooth, I was ready to stain.

I wanted it somewhat dark, so I did two coats of Minwax Wood Stain in Dark Walnut. After that dried, I covered everything in three coats of polyurethane, sanding with 320 grit sandpaper between coats.
And voila!
I also changed out the handle with something more industrial/modern which I may or may not regret depending on how often I snag cloth in the return.

It could be styled as a cute side table when not in use.


But with this beauty inside, what are the odds it won't get used?


Fun fact: if someone at Lowe's asks if you need help, you will waste a lot of time if you ask him whether or not they used the metric system in post-Soviet West Germany. They did. Metric all the way. There was only one of the original set screws that hold the machine onto the brackets in the case, so I had to get another. Unfortunately they only had M6-1.00 pan head screws at Lowe's, which wouldn't fit due to the head. So the next day we had to go to Home Depot for proper set screws. Whereupon we returned home and I realized that we don't own a metric hex-wrench set. *SIGH* Luckily we had a star-head bit from one of our various bit-driver sets that was close enough to get the job done.

TA-DA!
Couldn't be happier with the way it turned out, except that now I have to get it upstairs.

Saturday, August 17, 2013

If I Never Hear the Theme Song to Zelda Again It Will Be Too Soon

You'll be glad to know that I sat down and had a long talk with myself. I was in a car taking the very, very scenic route back home from an overnight getaway to Atlantic City, but technically that is still sitting. "Self," I said, "What you need to do is not less things. It's to just make more of the blog posts that you mean to make." Being very sensitive about the topic of things, as I generally feel that I have to do all of them - ESPECIALLY in the summer - I replied, "Yes. I know. But I have to DO THE THINGS." Master of compromise that I am...

...let me just point out that even while trying to type out this thought my husband asked if I was "feeling egg-y" which is his way of implying that I should probably get my butt into the kitchen and make some breakfast. So yeah, THIS IS WHY WE CAN'T HAVE NICE BLOG POSTS. And the washer just dinged telling me to put stuff in the dryer. And start another load in the washer. And if we're going to eat eggs we'll need toast which means I should start a batch of bread going. And and and...

ANYWAY. "Self," I offered, "Why don't you make a post about something you've done before you start doing something new?" And I've done LOTS of things, so that doesn't sound entirely unreasonable. If I do say so myself.

So what's up lately? It's summer which means the kids are home all day and they. are. BORED. Despite the house full of toys, books, science experiment sets, a trampoline, playground in the yard, bikes, metal detectors, weekly library trips they are BORED. When they say that they are bored what they actually mean is, "We want to play video games but you won't let us so we will get even by telling you every twenty seconds just how BORING life is until you give in and let us play video games." It's only in their heads that I will ever give in, though. We have video game time built in to our daily schedule and I have a saved (I really should laminate that) sheet from one of the kids' 9 to 11 year old check-ups at the Pediatrician which says that kids in that age range should have NO MORE THAN one hour of screen time a day. If the DOCTOR says that, it means that I am RIGHT and boredom is not, in fact, fatal.

One of the things that two of them have decided to fill the time with is piano practice. The mom in me thinks this is a fine idea. The person in me who doesn't want to hear Fur Elise 327498573984579387593875938 times a day disagrees. But mom wins out even when this happens to the piano bench:

One of these things is not like the others. One of these things just isn't the same...
I'm not sure how they even managed to do that to the leg, but they did it. Of course, it wasn't in the best shape to begin with. For one thing, this is the bench that came with the piano that my mom bought used when I was a kid, so it's pretty old. Like getting way too close to 40 for my comfort old.


So that was also a problem.
 It was pretty much just held together by a piece of twill tape and some rusty screws. When we moved to this house I decided to paint the piano itself (Why yes, yes I am THAT crazy), but the bench had already been through two makeovers as you can see from the bottom of the lid. I'd covered it with fabric that matched the upholstery on my old, old couch and did like a shabby-chic finish. Then, in a different house, with a different couch, I painted it brown and added fabric that matched a throw pillow (which I still have in this house with yet another couch).. Under all of that there is still the original brown vinyl covering.


Uh, yeah, it's SUPPOSED to look like that...
The only hope was to pull off everything, strip off the paint, and start over.


I didn't take any photos of the fun bubbly paint, or of my lovely then-10-year-old assistant sanding it down, but it looked pretty nice when it was cleaned off. Not nice enough to stain, mind you, but nice. I spray painted it with Krylon Dual Paint + Primer spray paint in glossy black and then covered the top in easy to clean black vinyl. I still like the old fabric, but I just wanted it to sort of disappear into the piano itself.

Look! The legs work!
 I also had to bend the bolt in the leg back into place so that they could, you know, sit on it. I filled the screw holes with wood filler so that the hinges would go in tight, and I used slightly longer screws.

Better, right?
And here it is, now camouflaged in its native environment...

Someday I will figure out how all those other ladies who blog take the pretty pictures where their houses looks nice and you don't just see every bit of dirt and chipped paint.
So now it's all set for kids to sit there and play the theme song to every video game ever over and over and over so as to remind me that even when I don't let them play video games all day, they're still thinking about them. Figuring out the notes to the songs. Writing them down in video game character illustrated song books so that their brothers can build upon their knowledge and play EVEN MORE video game theme songs. But, most importantly, they are, for a few minutes anyway, not BORED.

Sunday, July 7, 2013

So it begins...

Several months ago I started using Bloglovin' to read all the blogs I like to follow, and since I liked the format so much I started following a lot more blogs. The thing that impresses me is not so much all the beautiful homes, smart children, and impressive wardrobes that these lady-bloggers have (after all, my home is great, my children have their moments, and have you seen my closet??), it's how freaking often they can talk themselves into sitting down and writing a post. Honestly I have the best of intentions. I am ALWAYS up to something like what I read about on other blogs, and I'm usually even pretty good about taking pictures of it. What I'm bad at is actually getting around to writing the post. Which I guess is why they're able to support themselves by blogging, and I have to post a link to my Facebook to even have anyone notice.

For example, I wrote that probably three weeks ago and then never finished a post. I don't know why I make it into something so hard in my head, since compared to the ancient days where you had to upload your photos to some server then manually do all the HTML it's really easy. So anyway, I'm going to try to start posting more, but be warned that it will probably just be things from the garden for the foreseeable future. Like this!

One day I was so excited to pick the first summer squash of the season. I ran right inside stopping only to pull up an onion and grab a handful of garlic bubils that I'd recently harvested.

The goods.

Chopped it all up, threw it in a pan with some olive oil, salt and pepper.


And then ate it all in one sitting. Well, my husband got some, and even though he's not a big summer squash fan, he did like it. That's the magic of onions. And Parmesan.

That's summer in a bowl right there.

The hard part was that there had been just ONE squash. Now I'll have to wait like FOREVER to eat more squash. Right?

The next day:

OH GOD WHAT HAVE I DONE??

Just kidding. This took like two days. And now that the zucchini has started as well there is no way that even an enthusiastic squash eater such as myself can keep up. But I sure will try!

That took like ten minutes. What is wrong with me? (Please don't answer that)


And, in case you like Bloglovin' as much as I do, I added a big ole button over on the right so you can follow my blog there.

Sunday, April 14, 2013

Thank You For Being a Friend!

Is it just me, or do you get the Golden Girls theme song stuck in your head every single time someone invites you to a party? Imagine me belting out drunkenly and off-key:

Thank you for being a friend 
Traveled down the road and back again 
Your heart is true, you're a pal and a confidant. 
And if you threw a party 
Invited everyone you knew 
You would see the biggest gift would be from me 
And the card attached would say thank you for being a friend.


Although I suspect there would be more exclamation points in my version. Hey, why can't you do TV theme songs at karaoke? How about a KARAOKE THEME SONG PARTY?! Omg, I will have to throw this SOON! But for now my good friend CC hosted a housewarming party to show off her very modern new place close to Washington D.C.

The thing about CC is that she's better than me at everything. She has a very yummy cooking blog - Kitchen Konundrums  where she posts some of her creations. Although you can't tell from that how crafty she is, too. I spotted a home made spring yard wreath and some cool  homemade kitchen magnets at her house as well. And the lady can crochet rings around me without looking down. So when she invited us to her party and said I didn't need to bring anything, I knew I'd have to come up with something great!

Luckily there was an article in Wednesday's Washington Post by Jane Touzalin about her adventures in artisan cracker making. Now, I've made crackers before, but when she insisted, "The idea [to make crackers] struck me as brilliant, for several reasons. It would save me money. It would require no special equipment. It would let me customize my snacks to my taste. And a bag of rustic-looking crackers, tied with a pretty ribbon, would make a charming hostess gift, for the next time I had a hostess," I knew I had to dust off my rolling pin and do it again!

The crackers were simple (recipe follows) and I packaged them in a basket with jalapeno jelly made from last summer's harvest, some home grown cut sage tied into an approximation of a smudge stick, a bottle of bubbly, and some freshly cut herbs. I made matching labels for everything to match the basket, and had a cute gift to take to an equally cute friend!


The party was lots of fun and the food was A. MAZ.ING. (but you had me at home made bread and grilled squash!). For dessert, she made individual mousse cups with fresh whipped cream AND strawberry shortcake cups. WHO DOES THAT? Seriously, it was the best!

Crisp Rosemary Flatbread Crackers
from Jane Touzalin for the Washington Post
adapted from a recipe in the July 2008 issue of Gourmet

Ingredients
1 3/4 cups flour, plus more for the work surface
1 tsp baking powder
3/4 tsp salt
2 tablespoons coarsely chopped fresh rosemary
1/2 cup water
1/3 cup olive oil, plus more for brushing
Flaked sea salt, such as Maldon

Directions

  • Place a heavy baking sheet on the middle rack of the oven; preheat to 450 degrees.
  • Lightly flour a work surface.
  • Stir together the flour, baking powder, salt, and 1 tablespoon of the chopped rosemary in a mixing bowl. Make a well in the center, then add the water and oil gradually stirring them into the flour until a soft, shaggy dough forms. Turn the dough out onto the work surface and knead gently 4 or 5 times to bring the dough together into a soft, smooth ball. 
  • Divide the dough into 6 equal pieces. Work with one piece at a time and keep the remaining pieces covered with plastic wrap. Divide the first piece into 4 equal pieces; roll each one out on a sheet of parchment paper into a long oval shape, roughly two inches wide and nine inches long. Use the tines of a fork to prick the cracker several times. 
  • Brush each cracker lightly with oil and scatter a little of the remaining chopped rosemary on top, then a little of the salt, pressing slightly to adhere.
  • Bake until pale golden and browned in spots, 4 to 6 minutes. Transfer crackers to a rack to cool. 

Saturday, April 6, 2013

<a href="http://www.bloglovin.com/blog/6828739/?claim=7my3d4muf7t">Follow my blog with Bloglovin</a>

Switched because of the whole Google Reader thing. Like it better anyway.

Tuesday, March 19, 2013

Does This Shirt Make Me Look Like A Transvestite?

So, I've done refashioning before, and this is something that has been in the back of my mind for awhile since I've gotten so hooked on cardigans here in this unending winter. The thing I've never really done is taking a piece of clothing from my kids and making it my own. I have all boys, after all! But when it got cold last year (way too early, in October), I had them each go through their closet and drawers and pull out stuff that they'd outgrown or didn't like anymore. On the chopping block was this sweater that I'd bought for my oldest son when he was seven.


And he was still wearing it two years later at age 9. 


But by age 10 and after a growth spurt brought him up to five foot four, it wasn't going to cut it anymore. But It's argyle! I have such a weakness for argyle. So I stuck it in my closet of stuff I don't like enough to wear, but can't part with just yet. As this dreary weather drags on into late March, I've gotten pretty sick of all of my winter clothing, so it seemed like a good time to tackle this project. First, I tried on the sweater to see if I could just wear it as-is:


Well, I guess I COULD have just worn it, but I like my tops a bit longer, and the sleeves are too short. Plus how exciting is a plain old sweater? Instead I wanted to make it a cardigan that I could layer over other shirts because I have been all about cardis this winter.

I looked through the notions I already had on hand and found some gray ribbon and some target-like buttons from a big plastic bin my mother-in-law gave me. 


I just cut straight down the front of the sweater, using the diamonds as a guide. Then I pinned ribbon along the right side of the fabric and stitched it down, then flipped it around to the wrong side, tucking in the top and bottom to enclose all raw edges, pinned that and stitched close to the edge of the ribbon, like so:


See my Pfaff? I really love this sewing machine. The problem is that every time I use it I just want to use it more and more. This might be the fact that I just watched Fatal Attraction for the first time last weekend talking, but I might have to steal its pet bunny and boil it. It's just been sitting in the bottom of the pressboard case that it was in when I got it, but last night I tried it out in a sewing machine table I'd picked up a few months ago and it fit well enough. Not I just need to refinish that case, get a new handle and some set screws for it and I'll be in serious sewing business! Of course, it's going to have to warm up enough for me to spend time in the garage stripping and sanding it. 

Since I didn't want to have to put button holes on an unstabilized knit, I decided just to sew on snaps with buttons on the outside as decoration. That took a million years (six two-piece snaps and six buttons), but it was ready to wear the next day!


I pushed up the sleeves and put it over a striped T-shirt I've had forever with a black corduroy skirt that I made last month or so. And of course tights since it's still, unfortunately, tights weather. I know my iPhone is in the way. One of these days I'll get around to buying a proper camera and maybe a tripod so these pictures aren't so sad. But probably not any time soon. Regardless, I'm happy with the results. You really can't have too many layering pieces, and on fat days I can put it on and tell myself that I'm wearing a shirt made for a 7 year old. 

Tuesday, March 12, 2013

Falafel? More like FalAWESOME!

Being a vegetarian in 21st century America is probably a much different beast than in years and cultures past. If you miss hamburgers you can get something made of chemicals and bits of soy nearly identical to the real thing. Vegan but love cheese? Have some more soy that defies all logic by approximating real dairy goodness. Want some Kung Pao chicken, but without the dead bird in it? You can do that, but (spoiler alert) it's also made of soy.

Not that there's anything wrong with that! I love edamame, tofu, and even the processed stuff, but at a certain point you have to ask yourself, "Should I REALLY be eating this much soy?" Especially with the scary reports of GMO and Round-Up Ready soy strains crossing into the non-GMO population even when you do buy organic.

Luckily there are lots of veggie-friendly cuisines out there that branch out a little. Like most middle eastern food which, instead of being almost entirely soy, is almost entirely chickpeas! And boy do I love chickpeas. For several years now I've been trying to figure out how to make that classic vegetarian dish from the middle east - Falafel!

Personally, I love falafel. My husband loves falafel. Most sane and rational people love falafel. My kids, on the other hand, took one bite and said, "OF COURSE IT'S BAD, "AWFUL" IS RIGHT THERE IN THE NAME!" And after that falafel became the ultimate super villian around here. Not just at meal time, but in their play - "The Evil Dr. Whatever turns all your food into falafel. OHHHH NOOOOOO!" etc. The antidote for this was for someone to turn the food into "fal-awesome" instead. But now that I've finally gotten the technique down, two out of three kids will eat it. The third will probably puke it out on the table, but that's still pretty good odds in this house.

You can buy a box of mix, and that's pretty good (to me; that's what the kids hated so much), but it's nothing like the nice green, fragrant falafel you get at a good restaurant. You can try all the recipes on the internet that start with a can of chickpeas, but I've never had one turn out quite right. And even when you find a good recipe that starts with soaked dried chickpeas, the instructions often leave out one of the most important steps to ensure that the falafel doesn't just fall apart as soon as it hits the oil. But finally, after much trial and error, I have mastered falafel!


The best recipe I found came from food writer/cookbook author Mark Bittman, who is a great source for recipes of all sorts, but particularly vegetarian ones. His recipe can be found here, and it's a great starting point for anyone who likes a mild flavored falafel. When I followed the recipe initially I thought they were a bit lacking in flavor (for my taste! I like things bold!), and they did what most falafel do - fall apart as soon as they hit the oil. But the flavor was so much better than the previous few experiments that we were satisfied to just eat the batter pan fried in a large pancake-like thing that we ate as wedges; similar to cornbread. In the next attempt, I figured out what I needed to do. So here is my PERFECT falafel recipe:


Falafel (or Fal-Awesome if You're Trying to Feed it to Kids)


Ingredients
  • 1 bag dried chickpeas
  • 10 cloves garlic, peeled (or just however many are in a whole head, I don't believe there's any such thing as too much garlic)
  • 1 large onion, roughly chopped
  • 1 tablespoon ground coriander
  • 3 tablespoons ground cumin
  • 2 teaspoons cayenne, or to taste
  • 1 tablespoon garlic powder (again, I just really like garlic)
  • 1 cup chopped parsley
  • 1 bunch green onions, ends trimmed 
  • 2 teaspoons salt
  • 1 teaspoon black pepper
  • 1 teaspoon baking soda
  • 2 tablespoon lemon juice
  • oil for frying
Directions
  • 1. Soak beans overnight if you remember. 8 hours is really long enough, but more certainly doesn't hurt. 
  • 2. Drain and rinse beans. I always find bean-soaking water to be a bit too funky to use for anything. Transfer them to a food processor.  Add all of the other ingredients, starting with only half the salt and lemon juice so you can adjust the flavor as needed.  Blend it all together; it will be a bit grainy, not smooth like hummus since the chickpeas aren't cooked. Taste and adjust seasoning as needed.  You could really play around with any spices you like.  Anything you'd put in a dhal or curry would probably taste great. 
  • 3. Spray a cookie sheet small enough to fit in your freezer with cooking spray (or use parchment or a silpat). Shape the mixture into balls about 1 1/4" in diameter, or the size of a meatball. I just scoop out a glob with a teaspoon and then roll it between my palms to give it the right shape. This recipe will probably make three dozen falafel balls at least, so you might need a couple of cookie sheets. When you fill one, put it in the freezer for at least 15 minutes before moving to the next step. You can leave them much longer before they will actually freeze, so you could do this a couple of hours in advance.
  • 4. Heat oil in a pot or fryer to 350 degrees. An electric fryer with a thermostat will make this a million times easier.  Drop falafel, three or four at a time, into the hot oil. If it's deep enough to cover, cook them for 3 or four minutes until deep brown on the outside, and cooked through inside. If they aren't submerged, turn them about halfway through to make sure they cook evenly. 
  • 5. Remove with a spider or slotted spoon and drain on paper towels.


You can serve these with whatever other middle eastern dishes you like,  but my favorite way is to eat them on a home made whole wheat pita with hummus, tabbouleh, Israeli salad, maybe some lettuce or balela if we have beans in the freezer. Which sounds like a lot of work, but the nice thing is that all you have to do is chop onion, parsley, tomato, and cucumber and then you can pretty much throw all of that together pretty fast.

Oh, and don't forget the sriracha! Is it traditional? Probably not. Does it make everything better? Obviously. 

Since this recipe makes a lot, you can freeze them and have falafel ready for a quick lunch anytime. I've tried both freezing the dough balls and freezing the cooked falafel. Personally I prefer the latter. Freezing the dough and then frying it when ready made them drier and not as tasty. If you pop a couple of the frozen cooked falafel in the microwave for 30 seconds you can barely tell the difference from fresh. Which makes me wonder, in this veggie burger, soy cheese world, why doesn't anyone make frozen falafel?


Tuesday, March 5, 2013

One Man's Trash is Another Man's Sewing Machine

Although I don't blog about it all that much anymore, sewing is one of my favorite hobbies. I make things for the house as needed such as pillows, window treatments, and alterations to kids' clothes, mostly I make clothing for myself. It has been years since I shopped retail for clothing. Everything I wear is either hand made, thrifted, or both (as in refashions). So I am a big enthusiast of sewing machines, and I have amassed quite a collection of both modern and vintage machines that each shine in their own way. The truly amazing thing about vintage sewing machines is just how well made and really powerful they are. Sure they don't have automatic threaders or fancy stitches, but hit the right yard sale and you can get all sorts of cool vintage attachments like ruffler feet, narrow hem feet, and, well, frankly I haven't figured out what half the feet are even for.

Last year I was venturing out on my own one weekend and I spotted a big piece of plywood spray painted with FREE on it. I slowed down and decided to pass on the 80s era coffee tables and lamps, but then I saw a sewing machine and did a U-turn to snatch it up. Which isn't exactly the right description since the thing weighed about 40 lbs, but I tossed it in the car as best I could, and then excitedly called my husband even though I'd only been gone five minutes and we likely hadn't been out of each other's sight in weeks. You can call it co-dependent, but I call it teamwork!It;s just that an awesome discovery doesn't really mean anything without an appreciative audience!

My real hope for the thing was that I could use the table to hold my beloved vintage Pfaff that is currently residing in the lower part of the original carrying case (which has seen better days). But after getting it home and checking it out, I realized that the White Rotary machine was actually in a lot better shape than I'd initially thought. It was manufactured in 1917, but had been converted with a motor and installed in a new cabinet at some point probably in the 50s (based on the motor assembly). Still, it was worth salvaging, and although the cabinet was gross, I had faith that it could be beautiful once again!


This was after I'd started to take it apart and with a bit of sanding done. It was mildew-y, as if it had sat in a shed or wet basement for awhile, but it wasn't peeling apart like the last sewing machine cabinet I dealt with.


Unfortunately, the top did have some damage, so it seemed like painting would be better than stripping and staining it. The thingie on the left is a cool slide out mechanism that transfers the weight of the top when open back down through the case into the legs. I like that much better than the kind that rely on the front panel to be opened in order to support the weight of the top.


The little plug box was wired through the cabinet, so it must have come with it and was added at the same time as the external motor. There was no pedal with the machine, so I scavenged one from an old, broken Singer machine and rewired everything to get the machine up and running. Much to my surprise, the lightbulb still worked!


The machine itself was a good bit more work. I had to clean it all up, but also ended up taking most of it apart so that I could get inside and oil the appropriate bits and pieces. It took awhile, but eventually I got it all cleaned up (when I say "I", I mean that Neal helped a lot. This thing is HEAVY!) and working with only the addition of a new belt.

Interesting fact about White Rotary machines? They run backward.You have to spin the wheel away from you instead of  toward you as on most modern machines. There's a threaded hole to add a handle so that this machine can be worked manually with only the upper body. Also, they thread sideways - from left to right.

Once it was working, I was really excited to get the cabinet finished. I sanded it by hand with 100-, 150- and then 220-grit sandpaper, and then went over it again with 0000 steel wool. Honestly I didn't do that great a job since I was planning to prime and paint it. When we went to buy the spray paint, Neal talked me into trying Krylon Dual Paint + Primer in Glossy Black. This stuff is AMAZING! I've spray painted a lot of things in my life, but I'm not sure any have turned out as well. I sprayed on probably three coats, maybe four in some spots, just to make sure it had good coverage.

And voila!

I wish I had a picture of the whole thing when I first grabbed it, but I assure you, it looked nothing close to this. The machine cleaned up pretty nicely, too.


And of course there's the additional fact that now it works. 


Look how shiny! Although the handles and hinges are brass, no amount of steel wool or Brasso was helping, so I primed them, painted them with chrome spray paint, and then used antique gold Rub and Buff, followed by a coat of clear acrylic to seal it in.


When it's closed, I can shove the pedal into that little shelf on the door so that it just looks like a table.

I'm very very happy with this restoration, now I just have to think of something to make with the crazy, backwards sewing machine!